Wednesday, November 27, 2013

Christmas Decorating And Gift Giving With Scrapmatts Australian Chipboard~

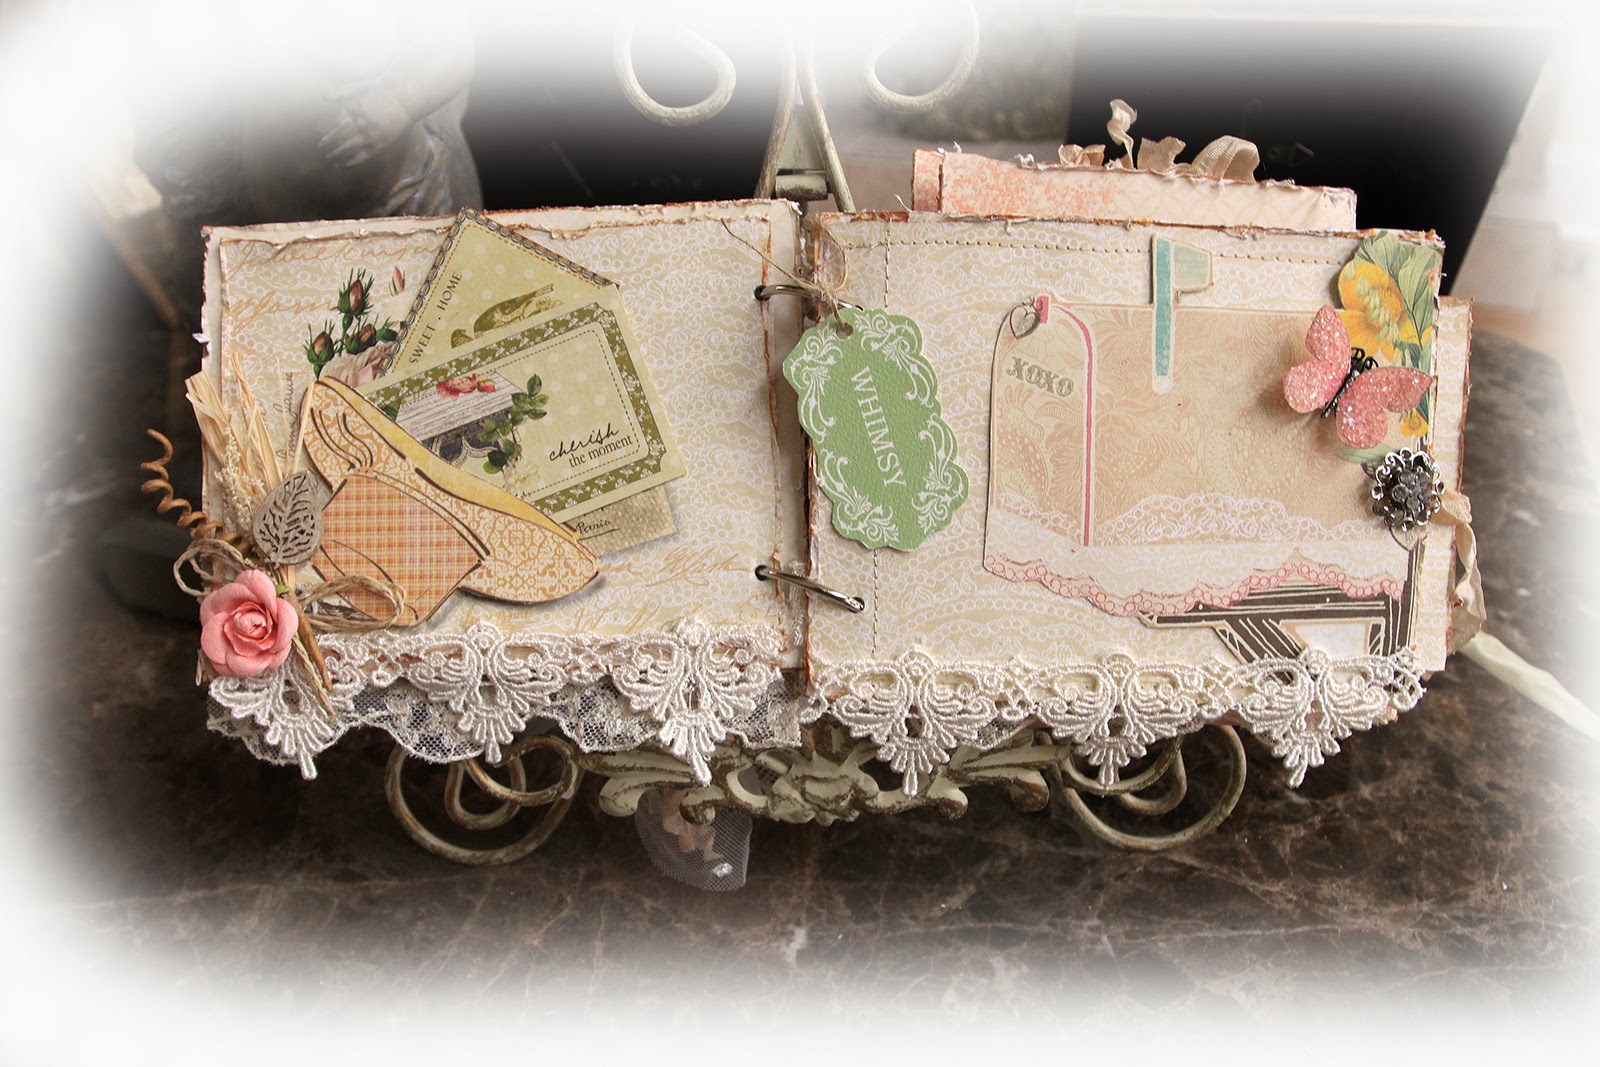
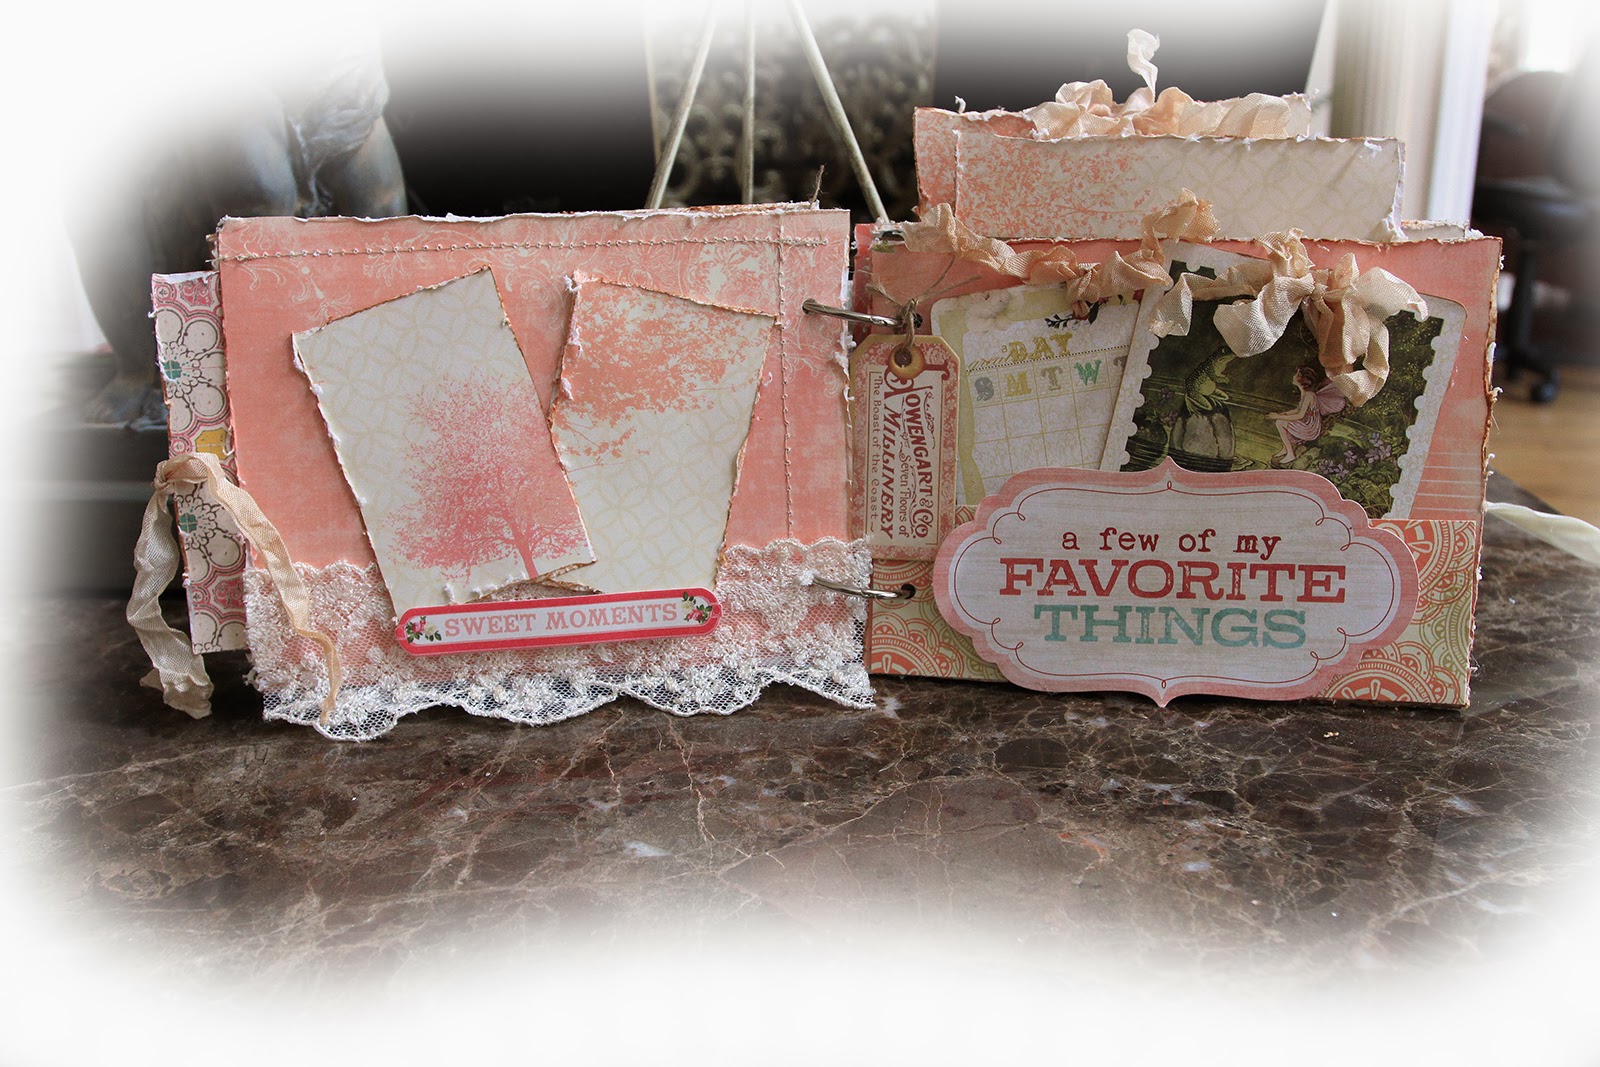
Today is my November Scrapmatts Design Team Reveal, and my first project up shows how you can use your Scrapmatts Chipboard to create something that you could use for gift giving. One of the fads this year is dying bottle brush trees and another is creating altered jars that resemble snow globes, so I teamed up both of those trends and created two different altered globes. Who doesn't love getting something as magical as a snow globe!!


I chose a non traditional color palette of teal, bleached out some little bottle brush trees I picked up, and then took some teal dye (left over from when me and the kids tye-died some t-shirts) and dyed them then frosted them with some German Glitter Glass. I added some Glitter Glass and traditional glitter to the bottom and then poured clear glue over it to seal it to the bottom, and also to stick the tree into so that became a permanent 


I then coated the lid with Mod Podge and covered it in silver glitter.


I tied a hand dyed seam binding bow and added a Scrapmatts
Merry And Bright Tag  that I glitter edged.


I then added reindeer moss, a Tresors De Luxe pearl and resin  flower spray,  some textured roses, feathers, a Smoky Teal Glitter Glass Butterfly from my Reneabouquets Etsy Shop, and a Scrapmatts
that I coated in glitter.


I repeated the process on the 2nd bottle.


This time adding a little bird's nest with a glittered up Scrapmatts


And a Scrapmatts
Tis The Season Tag.

And there you have it a perfect addition to your Holiday Decorating!!


This next project shows how you can use your Scrapmatts Chipboard to create something magical and beautiful to decorate for Christmas. I call it a Bucket Of Wishes!! So Vintage sweet to hang from a stocking holder on your mantle or tree.


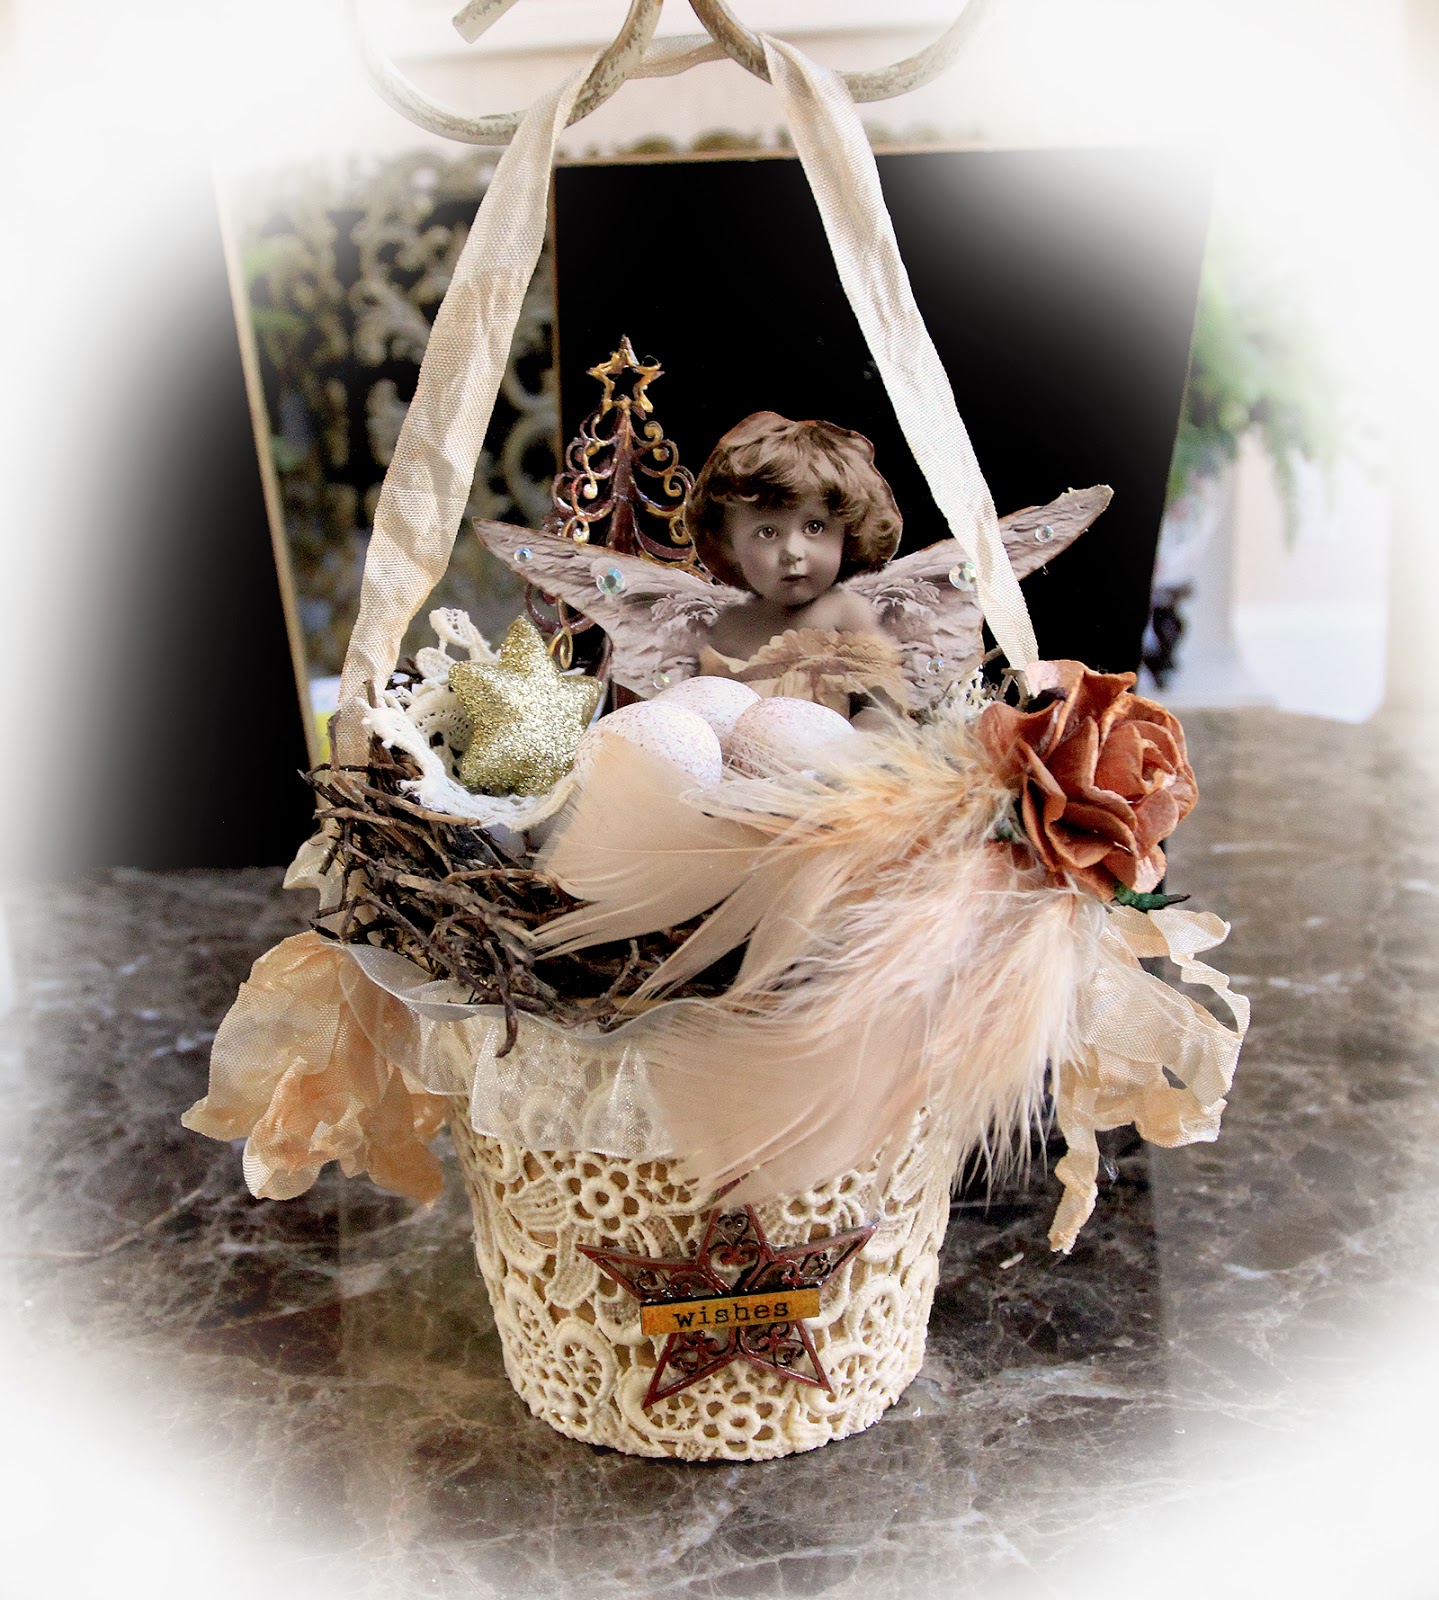
I started with a little metal bucket that I had lying around my scrap room waiting for an alter. I painted it with gold spray paint, then covered it in Mod Podge and then covered it with some gorgeous lace that one of my Scrappy friends Christine (Moonmist) had sent me. Thank you Christine!! I just love happy mail from my friends :) 


I then took a Scrapmatts
distress embossed it then added an inked up Scrapmatts
"Wishes" sentiment on top of it and attached it to my bucket.
I then added hand dyed seam binding bows to the side and created a handle from it as well, and wrapped the lip of the bucket with ruffled sheer cream ribbon.


I am an avid hiker, and in the Winter after all the nests have been deserted, I love to collect real bird's nests for my art and to decorate with. I tucked one of my little nests into the bucket, added feathers and a large flower, then tucked in some more lace, little hand crafted and painted, paper clay eggs, a little "angel" that I digitally color altered and added wings to, a glittered up star ornament and a Scrapmatts
that I soaked in water, peeled off layers, let it dry then painted and accented it with pearl paints and put it back together for a dimensional piece.


And there you have it a perfect addition to your Holiday Decorating!!

I hope that you have enjoyed some of the pieces that I have created for Christmas.

I wish all of you who celebrate Thanksgiving, a happy one! I am thankful for all of you~my scrappy friends! Hugs ~Renea


Tuesday, November 26, 2013

Shabby Girls Mini Album With Tresors De Luxe~


Hello everyone, around here we are getting closer and closer to Thanksgiving and I am already looking forward to lots of mashed potatoes and dressing!! I hope that you all have something planned out with your family, as for us we will be heading to the in-laws for some serious eating!!  My Father In Law, Frank loves to cook as much as I do, so he takes Thanksgiving and I take Christmas and both events are packed full of deliciousness~yum!!

Before I get too full to do anything but nap, I would like to share my last reveal project of the month for Tresors De Luxe!! I used lots of layers of those gorgeous laces to create the following Shabby Girls Mini Album. I combined them together with lots of Webster's Pages and Prima products from past Scraps of Elegance Kits, and I just love how romantic it turned out!!


The cover is centered around a piece with the quote by Audrey Hepburn "Happy Girls Are The Prettiest" which I absolutely adore. There is some girly grunged up corrugated board, Prima flowers, Die Cuts, feathers and one of those metal sewing bobbins topped with a rhinestone piece closures that I came up with,  some of my Victorian Velvet Glitter Glass Butterflies from my Reneabouquets Etsy shop, and two different layers of Tresors Lace at the bottom.
The D-rings have a sweet little bottle filled with seed beads, seam binding, rhinestone tulle and some Tresors

Lace Trim Applique in Ivory LA-106


Here you can see the cover a little more close up


And here you can see all the yumminess that all that Tresors lace creates!!


On the bottom I used Tresors

Ivory Italian Embroidered Lace LA-163


The first two pages have Tresors

Ivory Lace GL-005along the bottom.


I fussy cut out the hat from some of the papers and added it on with foam tape, and then added a Tresors

Rustic Shabby Chic Corsage Embellishment with Wooden Leaf FL-018

and topped it with a Prima Rose.


The two double sided note cards tuck into the hat.

And the side with the mailbox is a pocket that houses a double sided pull out.

The 2nd set of pages features some more of the Tresors

Ivory Italian Embroidered Lace LA-163


These are the 2 double sided cards that tuck into the pocket page.

The 3rd Set of pages feature more of the Tresors 

Champagne Pink Venice Lace LA-124

The lace comes that gorgeous pinky-peach color which is so delicious!


The Cherished Moments side has a top pocket that features a double sided pull out, and the glaussen pocket houses a hand stamped and inked tag. There is a sweet hand crafted from paper clay angels wing that I created and inked. 


The page with the tag and bag is the cover of a sewn 4 page booklet.


There is some more of that stunning Tresors

Ivory Italian Embroidered Lace LA-163

on the sides of these pages.


The You Make Me Smile piece opens up for more space.

The 4 double sided note cards are held by the metal clip and the last page features a top pocket with a double sided pull out.


And this is the back side of my mini.

Thank you so much for stopping by and taking a peek at my mini!! I just love working with the Tresors laces and embellishments!! They make putting something Shabby and Romantic together so much fun!! 

Well, try not to eat too much, and if we do well there is always the couch-lol!! Happy Thanksgiving!! I have so much to be thankful for, and will be counting my blessings which include all of you :) Hugs ~Renea


Thursday, November 21, 2013

Sketch Layout~Color Of Love Featuring The Scraps Of Darkness November Kit~Water Lilies

The Scraps Of Darkness November Kit~Water Lilies has revealed!! I couldn't wait for this one to arrive at my door, and I was not disappointed! With all those 7 Dots 9th Wave papers and all the other yumminess that came with it, I just had to get my hands extra dirty-lol!


Along with the kit you get this gorgeous sketch by Sue Pup:


And this is my take on this month's sketch:


This layout features a photo of a watercolor painting "Love Story 2" that was done by Anna Razumouskaya that I have secretly been dying to purchase. I collect art and I would love to have the set of two for my stairway, but I have a son about to go off to college, so it will have to wait. 
I did some extreme edge tearing and grunge punching,  then some heavy inking to get the really edgy look for the border. I then tucked stash lace and some of the kit flowers that I misted underneath. I then added puddles of glue, glitter and those FAB sequins from the kit to bling up the edges.


Under the photo, I added some gorgeous lace that my scrappy friend Christine (aka Moonmist) sent me. Thank you Christine, it was perfect for this layout! I took one of the Prima Paintable pieces from the Embellishment Add On and inked it up, used the Heidi Swapp Doily frame from the kit, and misted then sponge painted it, took a corrugated piece misted it than grunged it up with some Jacquard Dimensional paint and layered it behind the Doily, misted a paper Doily with 3 different colors of mist, added my photo, and then got to work on the flowers.


I layered misted cheesecloth that I accented with seed beeds behind the flowers. All the flowers were from the Floral Add On except the light teal one, and the leaves were hand stamped and fussy cut out.


I repeated another flower layer at the top corner of the photo.


I distress crackle painted, then inked, and dry brush painted areas at the bottom and top corners to get a yummy texture and dimension.


And here is all the dimension that the layering and techniques can give you.

I just love all the artistic and wonderful elements to this kit!! Melinda gives us such unique and wonderful combinations of material that can help us all to scrap with an artistic flare.  I encourage you to come hang out in our forums where all of our talented ladies talk, share and teach how to create some of the latest and greatest looks. It is so much fun and everyone is just so sweet and encouraging. I have been designing for the kit clubs for over 2 years now and I just love the tight knit community that we have over there. 

I hope you have a FABulous finish to your week!! Hugs~Renea


Monday, November 18, 2013

Scraps Of Darkness Reveals It's November Kit~ Water Lilies!

Scraps Of Darkness just revealed it's November Kit~Water Lilies! This kit was inspired by Claude Monet's painting "Water Lilies" and looks like a dream!
Stay tuned for the Design Team Reveal, but in the mean time don't forget to check it out!


“People discuss my art and pretend to understand as if it were necessary to understand, when it's simply 
necessary to love. ”
               ~ Claude Monet


Included in this month's kit:
Patterned Paper6 double sided papers from 7 Dots Studio's 9th Wave collection by Finnabair
3 double sided papers from Carta Bella's Wildflower collection
1 double sided die cut paper from Pink Paislee's Color Wash collection


Embellishments/Other Kit ComponentsBazzill:  1 sheet of coordinating Cardstock
Leaky Shed Studio: Flower Leaf Corner chipboardLindy's Stamp Gang: Mad Hatter Collection Mist - Cheshire Cat CherryPrima: Nieve FlowersGlitz Design: Wild & Free Collection 12 x 12 Cardstock Stickers - Alphabets & WordsCanvas Corp: White Tissuestock - 4 sheetsQueen & Co: Grass Green crystalsCraft Medley: Rhythm & Blues Sequins collection
Viva Decor:  Inka Gold - Cobalt Blue
Kaisercraft: Wood Flourish Dragonflies (2)May Arts:  Fuschia Wrinkle Ribbon - 1 1/2 yardsMay Arts:  Parrot Green Wrinkle Ribbon - 1 1/2 yards
An inspirational new sketch by Suepup, created just for our W
ater Lilies kit (seen below)


Thursday, November 14, 2013

Frosty Vintage Elegance With Tresors De Luxe~

Welcome to my Tresors De Luxe Reveal!! Today, I actually have two separate projects. The first one is an altered Book Box, and the second is an over sized tag that shows how you can take the same theme, and using your leftover pieces, create another project with no waste!


I wanted a yummy, Frosty, Winter look for this off the page project, to match the beautiful Vintage image that I had pinned on Pinterest, so I started with 2 different layers of Tim Holtz papers that I heavily distressed and inked. I then "frosted" the second layer with Snow Tex. I layered on a Tresors 

White Unique Vintage Handmade Cotton Crochet Doily DL-006 

that I lightly inked. I then took a corrugated board piece and frosted it up with gesso, Snow Tex, glitter glass and silver glitter, and then layered on an inked and texture painted Scrapmatts Chipboard Frame and put my image in it, and got to work on the details.


I ran some Tresors

White Venice Applique Lace LA-133
across the bottom, added a seam binding bow, and then added on some Tresors

Dusty Pink Fabric Roses PF-018

I created a corrugated die butterfly piece then added on one of my Oh So Pinkalicious Butterflies from my Reneabouquets Etsy Shop.


 I inked and crystal accented some Scrapmatts Snowflakes, added a ZVA flourish piece, and popped on a Tresors

Pearl Centered Ivory Lace Flowers FL-069


For the "binding" side of the book, I added on Tresors

White Venice Applique Lace LA-133

and accented it with crystals.

I created the "pages" with a modeling paste technique I use to simulate the look of pages.


The back is covered with more distressed and inked layers of paper.


And the inside is finished out as well.

And now here is an over sized tag that I created using the left over paper, and Tresors pieces.


The papers layers were the leftovers from the box layers, and the corrugated board, and flourish were leftovers that were cut off the box pieces.


I layered on the leftover Tresors

White Venice Applique Lace LA-133

And what was left of the Tresors fabric flowers


The same seam binding, image and snowflakes were used.

I added a Tresors

Rhinestone Button RH-004

to the seam binding.


And here is the finished back side.

And there you have it two FABulous projects!

I hope you have a wonderful finish to the week! Hugs, ~Renea