Wednesday, March 28, 2012

New Oceans Banner Created For The Rubber Cafe Using Scraps Of Darkness


 Hi everybody! As we slide into the middle of the week, my mind seems to be wondering more and more,  to a beautiful beach somewhere.  I love the soft blues and greens of the ocean, the textures of the boardwalk, seashells, and netting, as well as the various types of creatures that dwell there.
I created this banner with that feel in mind. I used pieces of the January  Scraps Of Darkness Escape Kit and Color Add On to create this tropical banner, along with lots of product and stamps from The Rubber Cafe.


 I started with a chipboard layer that I cut into the desired shape. I then used my Textured Tissue Paper Background Tutorial that I did for some DT work over at Scraps Of Darkness to create the background. The next layer is a piece of Corrugated Board that I gesso'ed and tore tidal pool, peek a boos into, then applied gel medium randomly and sprinkled on Terrifically Teal Your So Fine Glitter for lots of added texture and shine. I then took  Scrap Happy Glue and created corner patterns and glued down seed beeds for layered up texture. I can tell you putting those tiny little seed beads on is no picnic, but boy did the Stick Em' Up make my job easier!


 Here is a close up look at the detail of the background where you can see how in spots, I used Scrap Happy Glue  randomly, then sprinkled Terrifically Teal Your So Fine Glitter onto it to create a beautiful shimmer. If you look at the corrugated board you will see the detail of the Glitter on the places where I randomly used modeling paste.


 For the sentiment, I took the New Oceans Stamp and stamped it into some Creative Paper Clay,  took a sea shell and stamped it's edges around the edging of the paper clay, and let the piece air dry. I then took a Tim Holtz Distress Marker and colored the stamping in. I layered the clay piece onto a Graphic 45 paper from the January Kit that I heavily water distressed. I then ran some cheesecloth across the layer and added 2 Petaloo flowers from the kit, popping on some of the sweet Pearl Jellie Dots to the centers.


 Next, I stamped the Mermaid image using the Mermaid With Shell stamp, and then colored her in and then took Scrap Happy Glue  and did some detail work on her body and hair, and coated it with Copper Your So Fine Glitter , I then repeated the process for some of the bottom half detail and coated it with Terrifically Teal Your So Fine Glitter. I adhered the Mermaid piece using The One And Only Tape mounted on foam for dimension.


For the final details, I fussy cut some fish out of some Graphic 45 paper from the SOD kit, popped them into  the tidal pool, peek a boos, and gave them some little air bubbles using Crystal Clear Jellie Dots and then popped on some real seashells, and small dried starfish to top it all off. For a beautiful way to hang the banner, I set some eyelets, bent some Tim Holtz Memo pins to look like fish hooks and then threaded some Really Reasonable Ribbon, Sheer Iridescent Ribbon in Teal through the hooks and the eyelets.

I hope you enjoyed this visual trip to the ocean with all the color,  texture, and sea creatures. I know it is not as good as the real thing, but hopefully it allowed you to escape the real world for a few minutes. ~Renea

Monday, March 26, 2012

Scraps Of Darkness/Scraps Of Elegance Design Team Call!!

Have you heard? Scraps of Darkness and Scraps of Elegance kit clubs are looking for designers to add to our talented Design Teams!

Commitment is important, so we want to be straightforward with what we are looking for. We want to see ambitious, outgoing, computer savvy scrappers who share the same love as we do.

These positions will start with our May 2012 kits and end with our October 2012 kits.
This call is open to both US and International. Please note international members will share in the cost of shipping their kits to them.

So if you would like to be a part of one of the most fabulous kit clubs around, please visit our blog to view this call in its entirety. Just click HERE for all the details.

Good luck everybody!!

Saturday, March 24, 2012

SCRAPS OF DARKNESS REVEALS IT'S MARCH KIT-NEEDFUL THINGS

The first thing I have to say is the title to this month's Scraps Of Darkness Kit hits the nail on the head in calling it Needful Things, because it is packed full of so much yumminess that every scrappy girl needs!! Melinda, has done it again and packed the March Kit full of so many wonderful, unique and totally versatile papers and embellishments, that no matter what your style, you will find so many things to satisfy your scrappy cravings.


Along with the kit, you will receive a monthly sketch created by the super talented Charlotte aka Sue Pup and her inspiration is always spot on to kick your mojo into high gear. Here is this month's sketch:


And here is my take on the sketch titled "Discovery". I decided to try my hand at Steam Punk and totally fell in love with it!


 I started with two different layers of the Graphics 45 papers and distressed and inked them up. I then took another layer of paper and cut out a gear shape, and set eyelets into it. I then took another piece of that delicious paper and created the center of the gear and then another to back the image that  picked up on the internet compliments of Google Images.  Melinda had included these little pieces of ball chain, and I took them and created flourish pieces on the photo. and then tucked in one the G45 stickers that I had stickled up.

 Next I took some Grunged Up Gears from my 
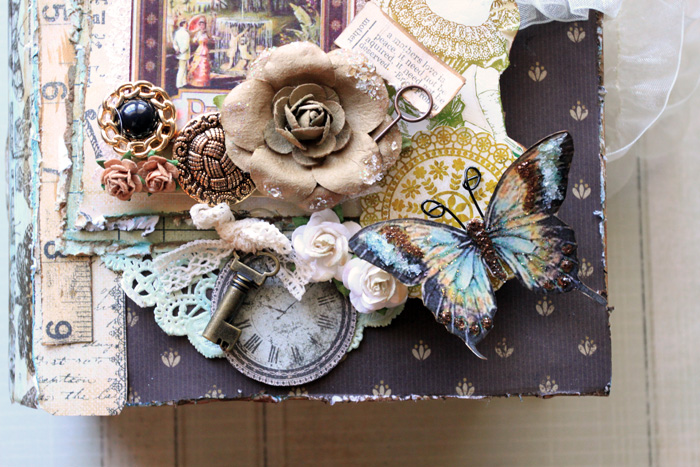
Etsy Shop and tucked one behind a peek a boo and then built a flower layer on some more tucking in black tulle and rose ribbon and popping on a sweet, stickled up butterfly that I had fussy cut from the G45 papers. I added some Metal clock faces with a brad and curled ribbon from my stash.

 Here I layered in some crochet trim from one of my SB.com friends Riza (Tonys Page), and took some more of the G45 stickers, stickled them up, layered on some Tim Holtz acrylic pieces that I had alcohol inked and adhered them with foam tape for dimension.

 For the large flower layer on the side I added lots of flowers from the Romance, and Flora & Fauna Add ons, more of those Grunged Up Gears, some more metal clocks, black tulle, rose ribbon, and some more of those stickled up, fussy cut butterflies. I then created another diamond piece to finish out the side. I tucked my coveted Mandy (Craftysprinkles) pin into the top section of my photo, for the perfect softness.


Here you can see all the dimension and layering that I love so much!

If you have never tried Steam Punk, I hope that you will give it a go, because it is so much fun, and you can take it any way you want. This one was more glamorous Steam Punk, but the following layout is more Mad Muse Steam Punk, and allowed me to color outside the lines and get a little wild!


 I actually created this using that reverse canvas process that Karen aka LostCoastScrapper uses. I cut out some of the G45 paper to look like a frame, and then covered the rest of the edging with Tim Holtz tissue tape. I then layered in another piece paper, and stenciled a grungy brick wall onto it, using modeling paste and Tattered Angels Glam, then I got busy with the details.

 In the upper left hand corner, I took the wreath that was in the kit, tore it apart and used it for curled branches, adding on the little owls from the Flora & Fauna Add On.
 

 I then created a Steam Punk Hot Air Balloon by taking corrugated board, cutting it to the shape, spraying it with some of the Maya Mist in the Color Add On, and then grunging it up with modeling paste and Glam. I used the pieces of ball chain and G45 chipboard to create the basket part of the balloon. I then gave the crow a big, green feathered tail. The eye piece is actually a bottle cap from one of my fav teas, Tazo White Cranberry. I love that stuff and have some of the caps saved, and this was the perfect opportunity to recycle. I cut the eye from a piece of the G45 paper and Glossy Accented it inside the cap, then crackled it.

 I took an image from Google Images and layered G45 papers underneath, attached a piece of the velvet ric rac onto the edge of the photo, and then added on a metal wing compliments of Shelly Anne and Metal Butterfly, compliments of Rebecca (Bexta). I then layered in flowers, and another one of the chipboard tags. I then took some wooden clocks from my stash and stacked them in. I took one of the SEI die cuts from the kit, Stickled it up, and used it for a shelf to hold the 2 chipboard medicinal bottles from the kit that I also Stickled up. Fussy cut the little crow with the sign from the papers and Stickled him up. I then attached everything with foam tape for dimension.


I love how the reverse canvas turned out, allowing me to play with all that extra dimension.

As soon as I saw the preview for this month's kit with those fun flying pigs, I knew I had to do a layout using them. Here in the South,  "When Pigs Fly" is something you would have heard many times as you were growing up. My Granny loved to use that expression-lol!

I had taken this photo of my son, pouting about getting his way while we were on a family outing, and it was so perfect for a fun take on that expression. The journaling is "I will fall for that, when pigs fly!"  Of course if you notice their is a pig flying over there in the top right, hand corner, because we all know it is hard to resist when our kids turn on that face!!

 I layered in lots of the Graphic 45 papers, corrugated board, burlap and fussy cut strips from the kit pps.


 Here I rolled down the corner, attached some little Vintaj gears from my stash, fussy cut out one of those little pigs, stickled him up and attached him to a Vintage look pin with one of the clips from the Flora & Fauna Add On.


 The pig emblem is one of the G45 stickers from the kit, that I Stickled, set eyelets in and wrapped wire through.


 I took some of the kit pps and heavily distressed them, rolled them, tied rope around them and then popped on some more of those stickers.


I fussy cut the tag from some of the papers, Stickled it up, added an eyelet and hung it with another one of those metal clips and added a Vintaj key that I embossed, using the metal add on that we had gotten in a previous month. The little arrow is just one that I cut from some card stock and grunged, and the letters are the chipboard letters from the Romance add on that I inked and stamped.

I love breaking out of my shell, and doing the humorous side of life every once in a while. One of my fav artists to visit, when I want to put a smile on my face is Happy Go Lucky (Vickie). When she does Winnie layouts, I never cease to walk out of her gallery without a big smile. Thanks for the inspiration, and the much needed smile, laugh and giggle, Vickie!


My final reveal project is an altered project. I had this ideal in my head, ever since I saw something similiar in a magazine. I of course took the bones of the ideal and put my own twist on it, and this is what I came up with. It is a glass jar that I turned into a Butterfly Sanctuary with all those wonderful butterfly items from the kit. I won't tell you all my secrets, since this one will be going into my Etsy, but I did use the butterfly images, the butterfly chipboard tag and some more of the pieces of the grapevine wreath that I broke apart to create this. I have to say it was one of those projects you have to have a lot of patience to do, because creating all of that inside of a bottle, through the opening of a  lid was not for the faint of heart-lol!

I love how it turned out, although I had no ideal how hard photographing a glass piece would be. If any of you have any pointers on that one, please feel free to leave them in my comments. They would be greatly appreciated!

Well, that is it for my reveal day projects! I hope you have enjoyed your visit and just want to say thanks for always taking the time out of your busy schedule to drop by! Hugs till I see you in the galleries! ~Renea

Wednesday, March 21, 2012

Do You Ever Sit And Dream? - Layout Reveal For The Rubber Cafe

Good morning to everyone! I have a layout that I did using lots of stamping, some of the wonderful Rubber Cafe products, and some Spellbinder's Die Cuts, to share with you today. It features a lovely Vintage image that I purchased from an online company with copy write permission from Georgia House Publishing LLC:

I used my Scraps Of Elegance March Kit-Butterfly Dreams to create the base for this layout.   I layered in lots of the new Bo Bunny Country Garden Papers from the kit, doing some distressing, inking, punching and machine sewing.The shaped layer was cut from some of the Bo Bunny paper and then I stamped it using the postcard stamp from The Rubber Cafe Vintage Treasures Stamps. I then crackled the paper to get an aged look and inked it up and then stained it in spots with Tim Holtz Tattered Rose Stain.  I then put my Vintage image into a Kaisercraft wooden frame from the SOE embellishment add on, and got to work on my details.


I stamped some flowers, using The Rubber Cafe Large Daisy Stamp, and then fussy cut out  multiple layers, applied The Rubber Cafe True Pink Puffies to the edges, heated them up with my heat gun and let it create all that gorgeous texture, and then took some Pearl Jellie Dots and added them to the centers to match my Vintage look. I then took a Spellbinder Spiral Blossom 1 die and cut out the cream flower, inked the edges and rolled it up. For the foliage, I used 2 different leaf types from The Rubber Cafe Leaf Set 1 stamped, them on to green card stock and fussy cut them out, tucking them in with pearl strands behind the flowers to complete the floral layer.

I cut out a decorative strip using a Spellbinder Parisian Accents die, and using Scrap Happy Glue adhered some Estelle Crochet Lace from Really Reasonable Ribbon on top for accent, then attached it to my layout using some of that foam tape that I create using The One And Only Tape. I then took a Dusty Attic Ribbon Slide and gussied it up using Tim Holtz Victorian Velvet and Picket Fence Stains. I then stamped the sentiment "Do You Ever Set And Dream" from one of The Rubber Cafe Vintage Treasures Stamps onto card stock, distressed it, stained the edges with Tim Holtz Vintage Photo Stain and adhered it to the chipboard piece.

I stamped a butterfly from The Rubber Cafe Vintage Treasures Stamps onto card stock, and fussy cut it out, tucking it behind the photo frame. Stamped a Clock Face from The Rubber Cafe Vintage Treasures Stamps onto card stock,  embossed it, and fussy cut it out, then tucked it behind one of the layers where I punched it.

I created another clock face, using the same technique as above, and tucked it behind a peek a boo I created by cutting and punching into the paper and then added some more of that Estelle Crochet Lace from Really Reasonable Ribbon, made a hand rolled flower that I accented with The Rubber Cafe True Pink Puffies and then stuck a sweet vintage pin into it for accent.

I repeated the peek a boo at the bottom, cut out 2 corner decorative accents  using the Spellbinder Parisian Accent die, stained them with Tim Holtz Vintage Photo Stain and popped on some Pearl Jellie Dots and added them to the corners .

 
I love lots of dimension and texture, as as you can see The Rubber Cafe stamps and products can give you lots of that yumminess with a little imagination and creativity. 

Thanks so much for the visit, and for letting me share this layout with you! ~Renea

Thursday, March 8, 2012

Secret Garden Altered Memory Book Box

Have you heard? Berry71Bleu is the sponsor of the March Sketch Challenge over at Once Upon A Sketch , so I invite you to come play along for a chance at one of the prizes that are being given away.

One of the  prizes that will be randomly chosen by entry is this GORGEOUS handmade tag from Berry71Bleu. Here is an example of the kind of tag you could receive.


You can choose to do a layout and journaling based on the sketch, or an altered item that includes a quote. I chose to do an Altered Memory Book Box, and my quote on it reads, "A mother's love is peace, it need not be acquired, it need not be deserved.# ~ Errich Fromm

 I created this book box using my Scraps Of Darkness February Kit. As you can see the kit was loaded with so many gorgeous papers that were perfect for layering and fussy cutting. My beautiful Berry Bleu Tag takes center stage, and then is surrounded by fussy cut timepieces, Kaisercraft Rub Ons that I rubbed onto card stock and then fussy cut and layered in.

 I used lots of inks and stains on the papers and Doilies to give them a vintage look. The Secret Garden Butterflies are from my Etsy Shop.


 I created the look of old worn pages, through layers of modeling paste that I textured and then inked and stained in multiple layers.


 I got the look of a worn book binding from Lisa Novogrodski's (Raining) Masking Tape Tutorial over at Scraps Of Darkness. I loved this technique when I saw a project that Lisa made using her fabulous tutorial, and I just had to recreate it. Instead of masking tape, I used Tim Holtz Tissue Tape and I love how it turned out. Thank you Lisa!!


 This is the back of the book box. I wanted to give it the look of an old, love worn book so I used multiple layers of ink, distress paints, stains and stamping. 

I just love how easy Marivic's Berry Bleu Tags make putting together a beautiful project. I love how this book box turned out, and I love that you let me share it with you!! ~Renea

Wednesday, March 7, 2012

Scraps Of Elegance Reveals It March Kit-Butterfly Dreams

Today is reveal for the Scraps Of Elegance March Kit-Butterfly Dreams, and the name says it all! It is packed full of dreamy papers and embellishment, and lots of butterflies!!

I absolutely loved this kit and I had so much fun creating with it! I didn't even need a ton of mojo, because this kit practically scrapped itself-lol! Just kidding, I did have to put in some work, but boy did it make my job easy!! Here is the lovely sketch from Ms. Charlotte (Suepup):
Here is my take on that beautiful inspiration, titled "Forget Me Not". The photos are of my SIL, Karen, with Kimmy and Zach, who became her instant family when she married:

(This layout includes my Sweetest of Days Butterflies that are included in the SOE kit and are also available in my Etsy Shop)

This next layout is titled LOL and features a photo of my cousin, Becky's little girl Emmie. I have scrapped Emmie many times before, and when I saw this photo, it gave me the giggles and put a smile on my face, so I just had to scrap it!! I take it Emmie found the Pigs at the County Fair Amusing-LOL!

(This layout includes my Vintage She Daisies that are available in my Etsy Shop)

I titled this layout from the beautiful Bo Bunny Journaling on the Combo Sticker, " Beauty Blooms From Within" and it features a photo that my son, Draven took of one of his friends Ashley. I love how she looks so natural and windblown in the photo, and the perspective of how he saw her.

 (This layout includes my Vintage Romance Flowers that are available in my Etsy Shop)


And last, but not least, is a layout I did, featuring a beautiful Vintage Image, that I purchased through an online service that sells Vintage Art for Georgia House Publishing. It is where I get all of my Vintage Images and most of my butterfly images from. Although some of my butterfly images come from google image searches,  I only download those that are not copy writed, and are offered up for free. The one's you purchase are just so much better quality, plus it helps me not to sound like a hypocrite when I tell my teenage son that he must pay for music and movies-lol! This layout is titled "Seeds":

I really appreciate you coming by, and I hope that you enjoyed all the layouts that I created using that magnificent, Butterfly Dreams Kit! Thanks for letting me share with you! Hugs~Renea

Sunday, March 4, 2012

Spread Your Wings Card-DT Work For The Rubber Cafe

Hello to all!! I am very excited  to bring you my very first Rubber Cafe reveal. From the moment, I opened up my box of goodies, I couldn't wait to get started and literally had so many ideals going on in my head that I had to give myself a time out-lol!  I created the following card based on a sketch from Scrap Book News And Reviews, and used a lot of soft, spring time colors.

I started with a card, made from plain card stock that I inked up using some Tim Holtz Distress Ink, and the sponge tool from the Lil' Inkers Set. I then took a piece of  Melissa Frances Paper, cut it to the size I needed and distressed the edges and then stained those edges using Tim Holtz Tattered Rose Stain.  I then layered on a piece of vintage look lace, using  Scrap Happy Glue.  I took a Webster's Page Journaling Card and distressed and stained the edges with Tim Holtz Victorian Velvet Stain  adhered it to my card I then stained  Pink Paislee Mistable with the Tim Holtz Tattered Rose Stain .

 I really wanted some dimension to my card so I took a foam sheet that you can purchase from any craft store (very inexpensively), and some of  the One And Only Tape then layered the tape in rows on both sides of the foam.

 I cut the foam and tape into strips to create my own "foam tape" at just a fraction of the price that it costs to purchase the premade tape. I then attached the mistable on top of my journaling card.


Next I took some flowers and created a flower layer. Stamped some green card stock with the rose leaves from the Leaf Set 1 and tucked them into my flowers.


To create the sweet little clay tag, I took some Creative Paperclay rolled it out really thin stamped the word "Wings" from the Spread Your Wings Stamp into the clay and let it air dry. I then colored the word in, set an eyelet, pulled some ribbon through, and then popped on a Pearl Jellie Dot for interest.


I then took the same  Spread Your Wings Stamp stamped onto a piece of cream card stock, cut it out and distressed the edges.


Repeated the process for the "Your" part of the sentiment.


I used the Flat Wing Butterfly Stamp to stamp the image onto plain card stock. I then fussy cut the image out applied some little pearl accents using a Cream Pearl Pen and then added a little Pearl Jellie Dot  to the body. I then gave my butterfly wire antennas and adhered it with some of that homemade foam tape for dimension.

I then created a "Fly" banner, attached it with the foam tape and added the pearl string. I just loved working with all the amazing Rubber Cafe products for the first time and see all of their unique products and stamps bring my creation to life.

Thank you for letting me share my work with you, and I hope that no matter where you are, and no matter what season you are in that this card brought a little bit of Spring into your day! ~Renea