Friday, August 26, 2011

What's True Is True

The following is a layout that I created with my Scraps Of Darkness August Kit-Envy, plus some pieces from past kits, and it is based on a song that my husband, and I wrote together. He came to me with this fabulous, artsy idea and he had the music and some of the lyrics down, and wanted to know if I wanted to help him fill in some of the lines, and I immediately jumped on it, because it was right up my alley. Very moody and dark with a twist. The song is about a woman, who at first you think is reflecting about someone she is in a relationship with, but then you realize she is looking into the mirror, reflecting on herself. The following is the lyrics:
 
mirror mirror
tells only the truth
While keeping my secrets
safe in this room
lost in the shadow
nothing seems clear
face to face
a stranger appears

Chorus:
ONE GLIMPSE
THAT CAN SHOW ME
JUST ONE LOOK
TO REMIND ME
THERE’S ALWAYS A DIFFERENCE FADING
TO WHAT’S RIGHT TO WHAT’S WRONG
LOOKING THROUGH LONELY EYES
TO THE BACK OF MY MIND
WHAT’S TRUE IS TRUE
I CAN’T MAKE YOU LOVE ME
WHEN YOU CAN’T SAY YOU LOVE ME
WHAT’S TRUE IS TRUE

THIS LOOKING GLASS
HAS A HANDLE TO HOLD
I PULL IT UP CLOSE
WATCH THE TRUTH UNFOLD
BUT THE TRUTH IS I’M LYING
THE SECOND MISTAKE’S
LIKE THE FIRST ONES I MADE
ARE ALL VERY PLAIN LIKE THE LINES ON MY FACE
NEVER LEARNING
Chorus:
Repeat


Bridge:

THE REFLECTION REVEALED
FEELS COLD ON MY HANDS
GUILT WRAPPED UP IN SHAME
TRAPPED IN THE FRAME
WAITS THE GHOST FROM MY PAST

I CAN’T MAKE YOU FEEL
INSIDE WHAT I FEEL
I CAN’T MAKE YOUR LIES
BE TRUTH FROM YOUR LIPS
I CAN’T MAKE TODAY
BECOME YESTERDAY
WITH A MAGICAL GLASS
FROM A FAIRY TALE PLACE
I CAN’T MAKE YOU LOVE ME
YOUR ANSWERS ARE WRONG
SO BACKWARDS AND FAKE

I CAN’T MAKE YOU LOVE ME
NO YOU CAN’T SAY YOU LOVE ME
WHAT’S TRUE IS TRUE


I started with a piece of stash card stock, then punched the gorgeous black and purple Robin's Nest
pp from this month's kit. I then took and mixed gel medium with acrylic paint and stenciled the design onto the pp. I took a piece of stash black card stock and punched a circle from it, took some more pieces of card stock, inked and distressed the edges and then layered them in behind the photo. I took one of the Pink Paislee mistables from this month's kit, misted it with some of the Colorinz Mist from last month's color add on, added some stash Prima pearls and tucked it into the card stock layers.


 I then distressed the edges of the photo and wrote my title onto the mirror in the photo. I added two glitter butterflies to the corners, for dimension.


I created a strip from a stash piece of card stock, punched it, set some glitter brads and did some lacing with some white ribbon that I dyed black. For the bottom collage, I took gel medium mixed with acrylic paint and made a layer. I then took some of the Pink Paislee Mistable Fuzzy stickers and created a collage. I painted each piece with the H20's from July's color add on, and then spot painted the acrylic paint with H20 and Tattered Angels black glam to get a multi-dimensional, yet monochromatic look.

I added a Prima trim piece from May's kit, then took a Chipboard Corset that I purchased from the Scraps Of Darkness store, painted it with TA Glam, added some glitter glass and then laced it with some purple embroidery thread. 


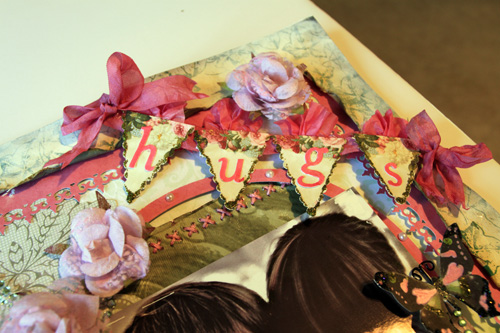
I took the Prima pink flowers from the kit and painted them violet with the H20s. I then cut out some leaves with my Sizzix in black and hand detailed them in pale purple paint.


For the final touch I distressed and pushed down the upper left hand corner, tucked in some tuile that I hand dyed, and added a piece of chipboard that I painted with TA Glam and then took one of the mini roses from the kit, painted it with H20s and popped it in the center.

Wow, I did not realize that I did so much painting and technique work until I was typing this out. I love to paint and doing these really artsy pieces is one of my favorite things to do. I encourage you to pick up a paint brush, grab some color and see what happens. You don't have to be a Rembrandt to enjoy the art of painting! ~Renea


Wednesday, August 24, 2011

Twisted Sketch #116 Twist Metal-Favorite Things

Wow, this week has flown by! I can't believe it is Wednesday already, and time for another Twisted Sketches reveal! The following is this weeks sketch and the Twist is Metal:


Below, is my interpretation of that fabulous Sketch, and here is one of my favorite quotes that inspired this layout:

"You... were created to be loved. So for you to live as if you were unloved is a limitation, not the other way around... Living unloved is like clipping a bird's wings and removing its ability to fly... A bird is not defined by being grounded but by his ability to fly. Remember this, humans are defined not by their limitations, but by the intentions I have for them; not by what they seem to be, but by everything it means to be created in my image. Love is NOT the limitation; love is the flying. I AM love. "
William P. Young (The Shack)


I used my gorgeous Scraps Of Darkness August Kit -Envy to create this layout that features a few of my Favorite Things. Both photos are of things that my amazing husband of 21 years has gotten for me. The first favorite thing is my Old Country Roses Tea Set. When I was a little girl, I had a friend who was elderly, Mrs. Frailey. She was a widow, who had once traveled the world with her husband, and had a collection of beautiful tea cups from different places that they had visited together. I loved going to her home and spending time with her in her rose garden. She would fix me chocolate cupcakes, and let me eat them warm-no icing-just like I loved them, and serve me tea in one of her precious cups. She always knew how to make a little girl, who came from a family that didn't have much, feel special.  That relationship with her shaped so much of my life, and is where I get my love of all things vintage from.  My husband, knowing how much I love these things, took me to purchase that tea set. We had just moved into our new home, and I was about to host a girlfriend party, and he surprised me, by taking me shopping to pick out the tea set that he knew I so dearly wanted. The second photo is of my Staffordshire Dogs. Again, Mrs. Frailey had owned a pair of these beautiful dogs, and my husband had heard me talk about them, and knew that I secretly browsed the internet looking at them from a distance. One Christmas morning, we got up and started letting my son unwrap his presents. We don't normally buy for one another at Christmas, but there was a large box for me, under the tree from him. I unwrapped it  and there they were a set of real, copper painted Staffordshire dogs! He had found an auction house in England that had an estate set and had purchased them and had them flown in for my Christmas present. I cried like a baby. I don't think anyone has ever done anything so thoughtful for me in my whole life, but that is why I love him, he always knows what is in my heart and does everything he can to make my dreams come true!

The first thing I did was to take the shape in the sketch, and create 3 graduating templates in that shape for my layers. I don't have a Cricut, so I just drew the shapes out onto chipboard and cut them out. I started with one of the pps from the Envy kit and then traced the template shapes onto some stash card stock and some of the cream card stock from this month's add on. I inked, and distressed the first 2 layers and on the 3rd layer, I used a stencil and misted the pattern onto it. I then took some stash, pleated ribbon and tucked it in under the 1st and 2nd shape layers. I placed the photos on to get the began building detail.


I used a couple of the Petaloo flowers, and some of the mini roses from the kit to create 2 flower layers and tucked in some pieces of a  ZVA piece that I had in my stash. I stuck the stick pin that our super talented sister, Mandy (craftysprinkles) made for the Romance Add On, into the bottom flower layer, and I handpainted a Dusty Attic Teapot and tucked it into the top flower layer. I then used a Tim Holtz bird metal adornment that I gesso-ed and used some Mica from the color add on to soften. This was one piece of my metal twist.


Next I started adding adornment to my top photo by cutting out a photo corner from the Webster Journaling Cards that came in the Romance Add On, and attaching it with foam dots for dimension. I took some stash Melissa Frances pearls and added them to the upper corner. I then hand painted some of the Dusty Attic tea cups and stacked them on the side of  the opposite corner.


I took a Dusty Attic Wrought Iron piece and painted it then used rub ons to gussy it up.


For the bottom photo I did the same steps, the only difference is that I used a Journaling Card that had the words favorite things on it for my title. 
I then took some more of the journaling cards and ribbon and created a mini journal and wrote the thoughts that I talked about to you, inside of it and tucked it into the bottom corner.

For the finishing points, I added 3 little metal buttons (another piece to the Metal Twist) that I gesso-ed  to the upper left corner, and then cut some strands of pearl trim and tucked them into opposite corners.

It is amazing what having people, who treat you special, in your life can do. It can change everything. I am grateful that along the path of my life, there were people who were willing to do just that. Find a lost soul, show them some kindness, and give them their wings to fly. ~Renea


Tuesday, August 23, 2011

Scraps Of Darkness Is Being Featured At Creative Imagination's Blog

All of us over at Scraps Of Darkness are stoked that we are being featured on the Creative Imagination's Blog! Our very own Lisa (aka Raining),  worked very hard to bring us to the attention of Creative Imaginations, and they have decided to do a 3 day feature on us!
There will be 3 days of posts, with 2 posts each day, featuring some of the beautiful work by our fabulous Design Team. Today is the first day, and we are not sure of which days the other two will be.
Here's the link if you want to check it out: http://creativeimaginations.typepad.com/creative_imaginations_blo/

Thank you Lisa, for making this happen, to Mel, for giving us such an amazing place where we can scrap like ourselves, and color outside the lines, and to the whole Design Team for the gorgeous work that made Creative Imaginations take notice!

Sunday, August 21, 2011

SCRAPS OF DARKNESS AUGUST STALKER CHALLENGE

Each month, I host a Challenge over at Scraps Of Darkness  called the Stalker Challenge. This month's challenge invites the participants to stalk the internet for a card sketch, card artist, or the recesses of their mind for an idea to help them to come up with a card. The card doesn't have to be anything fancy or elaborate, I just want them to try something new or if they already make cards to share what they know.
The Rules:
1. Use at least 50 % Scraps of Darkness product. This can be kit product or store product.
2. Make the card using scraps leftover from another project.
3. Use distressed layers.
4. Include some fussy cutting
5. The most important rule of all-HAVE FUN!!

Here is my example for the challenge using Rule #1-at least 50% Scraps Of Darkness product:


Rule #2  Use your leftovers: I used my leftovers from my Now layout. I love the brown and green color scheme and didn't want to waste not one little bit of those pps. The bottom layer is a leftover piece of the brown cardstock from this month's add on. The 2nd layer is a piece of the green foil pp from the kit. The 3rd layer is one of the Pink Paislee mistables from the kit. The 4th layer is a piece of the leftover cream card stock that I had misted with the Lindy's mist from this month's color add on, and the image is a free one I found online.


Rule # 3-Use distressed layers: I distressed all of my pp layers and inked the edges . I even took one of the Webster's Pages Journaling Cards and cut out the sentiment, then tore and inked it's edges for my card sentiment.


Rule#4-Include some fussy cutting- I took one of the Webster's Pages Journaling Cards and fussy cut out some of the flowers and adhered it to my photo with foam tape for dimension.


For detail, I added some trim from my stash. In the process of cutting the trim some of the little seed beads fell off, so I just took them and glued them to the upper right hand corner for some added detail. I then took one of the glitter brads from the kit and attached it on top of the trim.


For the inside of the card, I used some more of the cream card stock from this month's add on, distressed and inked the edges, then stamped the outside edges with a script stamp and left the inside blank for adding the sender's message.

Rule#5-Have Fun!!! I definitely got this one in! I just love making cards to give to my friends. They don't have to be fancy, just made with love!! ~Renea

Monday, August 15, 2011

SCRAPS OF DARKNESS AUGUST KIT-ENVY

It's the 15th, and you know what time it is, reveal time at Scraps Of Darkness. This month's kit is packed with girlie-girl deliciousness!  The kit is called "Envy", but us girl's over at Scraps Of Darkness have been calling it the Jewelry Box, because it is packed full of some of the most gorgeous gems out there. I love that Mel puts together kits that are so versatile and never take on the same old same old look. I am always amazed at all the different types of layouts that can come out of one kit!


This kit is so lovely and the add ons are equally as beautiful. The kit features papers from the Robin's Nest and Kaisercraft in romantic pinks, greens and blues. There are also some rich browns, and yellows.  The colors are all soft, beautiful and so perfect for  a vintage or shabby chic look, and the way the papers work together with the embellishments and add ons make scrapping, one gorgeous page after another a breeze.

The Main Kit; includes 10 sheets of premium patterned paper, as well as embellishments that will coordinate with those papers, along with new sketch each month, specially designed by Suepup for that kit. 

So get your girlie-girl side on and join us before these kits are sold out ( I promise you it won't take long). ~Renea

Happiness Is An Unexpected Hug!

I have to admit when I first got this month's Scraps Of Darkness  kit, I had a hard time changing gears.  I have been in a very grungy, artsy mood here lately and I had to step back and take a breath. I broke out my Romantic Homes Magazines, took a look at how I came to decorate my home, which looks so much like this kit, I scoured my Tea Party Books, fixed my hair, and put on makeup-anything that put me in touch with my feminine side, and then let the mojo flow. The following is  this month's Sketch, by the so very talented, Charlotte (aka Suepup):


The following is my take on the sketch that features a sweet photo of my son when he was around four years old, and one of his friends, Jennifer. Jennifer adored my son and she just couldn't help but give him a big squeeze! I just love a great big, bear hug myself, but there is something so sweet, and spontaneous about children, they just have to express what they are feeling in the moment. I think we adults could learn a few lessons from them!


I started with one of the soft green kit pps for the background. I loved the Ivy paper, but it was just a little too dark, so I gesso-ed  it by taking the gesso and rubbing it on with my fingers, so that I could leave, spots of the darker color and blend the other sections in. I then cut a square out of the center of it, to make it into a frame and scalloped, inked the edges with the chalk ink from the kit, and water distressed the edges. I then took a pink kit pp and punched it to make the inside design of the frame. I took a damask piece of kit pp and fussy cut it out for the strip beside the photo, cut a rectangle out of another kit pp, distressed and inked the edges and then hand stitched some x's onto it. I used the same pink paper to cut a circle from and then added some stash pearls for accent.


I had some chipboard windows that a friend from SB.com, Cindy Gay had sent me. I painted it with white crackle paint, and then took the pink Mica from this month's color add on and rubbed it into the cracks. I used a twig from one of my trees and created a little "nature scene" using a nest I fussy cut from one of the Webster's journaling cards from the Romance Add On, and a little bird and coating them with UTEE. I took a small piece of ivy from my stash, and some of the little white roses from the Flora & Fauna add on, that I tipped pink with the beautiful pink mica from the color add on and tucked them in with the nest and bird.


I attatched some of the Pink Prima Flowers from the Flora & Fauna Add On at the top of the circle and at the bottom as well. I cut apart the ZVA bling from the kit and popped a piece at the top and corner of the photo and one at the bottom, and added some Magical Pink & Green Butterflies from my Etsy Shop. I took some stash rub ons and rubbed them onto the photo for an added touch of detail.

I created a sweet banner by taking the journaling cards from the Romance Add on, cutting them into triangles, decorating them with stickles, and letters,  to spell hugs,
pleating tissue paper for the insets, and adhering them to hand died seam binding and creating bows to match. For the finishing touches I added some little pearl pieces to the inside of the frame piece, and printed out my journaling "Happiness Is An Unexpected Hug" and attatched it to the bottom.

I hope you get to experience the joy of an unexpected hug this week, or better yet give one! Huge Hugs From Me To You! ~Renea

Prince Charming- Scraps Of Darkness-Darkside Challenge

This is a layout I created with the August, Scraps Of Darkness Kit-Envy. I created it for Celina's (forevervampress) Darks Side Challenge. This is a fun challenge that you don't have to use Scraps Of Darkness for, just join in, and the Challenge this month is Enchantment, any way or any how you want to interpret it. This is my interpretation:


The first layer is one of the beautiful green Robin's Nest pps from the kit. I then took the die cut and cut out the center, then added some stash trim to the inside of it. I then took a piece of kit pp and cut out a background and added a cut up doilie for the edging. Next I took the piece, that I cut out of the center, cut it into a photo mat, and distressed and inked the edges. I then took a photo of my son, Draven  with his friend Jennifer and toned it to match the colors of the layout in Photoshop, and used a rub on from my stash to cover up some of the background noise.


I took some Vintage Flowers from my Etsy Shop and layered in some of the fern pieces from the kit that I gesso-ed, some of the Kaisercraft Posies from the Flora & Fauna Kit, some leaves that I cut with my sizzix, and some reindeer moss from my stash and created the large flower layer.

 I then used  a small Vintage Flower, some of the mini white roses from the Flora & Fauna add on with a piece of Prima bling from the May kit that I cut apart, and made a second flower layer. I added in one of the sweet Melissa Frances mini frames from the Romance Add On and popped in one of the Blue Moon Trinkets from the Romance Add On. I tucked in some of the reindeer moss behind the die cut and fussy cut out a digital bird and UTEED him up for a glass look and tucked him into the flower piece.

I took another piece of the Prima Bling that I had cut up and added it to the top left hand corner and added a butterfly. I used one of the Melissa Frances mini frames to frame out the first word of my title "Prince".

I then cut out some digital tiles that I had purchased on Etsy. Framed the C in "Charming" with one of the Melissa Francis mini frames, popped on a couple more butterflies and some stash pearl pieces. Added some Dusty Attic Corner pieces from my Etsy shop, and that was a wrap.

Hope you can find the time to come and play along with one of our challenges! They are always so much fun, especially when your friends play along with you! ~Renea


Now

I don't know if any of you ever check out Scrapbook News and Reviews (SNR), but it is a really cool online scrapbooking magazine that features artists and has tons of information and tutorials. I usually try to submit some layouts to them periodically for publication, just because it is so much fun to see yourself published and if your lucky to see your layout pop up on the front page featured layouts! I encourage each of you to give it a try, and guess what if they don't accept something you send in, no one will ever know but you. This layout was created for their one word title call this month, using, you guessed it a one word title with the word "Now". It features a photo of me that my son, Draven,  snapped back in the winter of me when we were heading out somewhere fun for the Holidays. He usually captures me with some goofy look on my face, but this one was actually nice, so I wanted to use it.


I used this month's Scraps of Darkness Kit-Envy to create this layout, and started with one of the gorgeous foil pps from the kit. The next layer is a piece of the card stock add on that I used the Prima stencil from July's kit to mask with and some of the yummy copper mist in this month's add on. That is one thing I love about these kits, Melinda packs them full of so many things that you will continue to reach for and use long after that month has flown by. The circle layer is the same foil paper with distressed and inked edges and the layer behind the photo is another piece of the same card stock, with the same misting technique.

I took a piece of the robin's nest pp that I had cut and used in another layout, and cut out the feur de lis design from it and stickled it up and used it for a decorative accent.


I created a flower layer by taking a piece of Dusty Attic Chipboard and gussying it up with some of the Green Mica that was in the color add on. I used a Golden Goddess Flower from my Etsy shop then popped on 2 of the Petaloo flowers from the kit.

I took some rose trim from my stash and made a border at the bottom.


I used one of the Pink Paislee Mistables from the kit, took some thicker letters, and painted them with the mica from the color add on, and then rubbed 2 of the small dragonflies onto it from the Robin's Nest rub ons that were included in the kit.


For the piece de resistance, I popped on one of the stunning Prima Butterflies from the Flora & Fauna add on.

Thanks for stopping by and for checking out my work! I just love when you visit! ~Renea

Moments That Take Your Breath Away

The following layout is one that I did using my Scraps Of Darkness August Kit-Envy. It features some pics that were taken when we went to Daytona Beach for a Nascar race last year. Yes, that is me in the smaller photo, enjoying the gorgeous view of the sun rising on the beach! I have been seeing so many of my friends doing these beautiful beach scenes, and I just couldn't help but want to do one of my own, but of course in my own way. Thank you to all of you out there who inspired me, but then again you guys are always my inspiration!


I started with a piece of the gorgeous Robin's Nest kit foil pp, then took a pieces of the cardstock from this month's add on, and did some punching and machine sewing on it. I then created some layering pieces from 2 other kit pps by tearing and inking the edges and doing some more machine sewing on one of them and using some of the kit rub ons to add interest to the corners.


I then used a crochet piece (a sweet gift from my friend ChattyKathy),  that I cut apart and used for a textured underlay. I took some Vintage Seaglass Flowers for my Etsy Shop, and layered them in over the kit ZVA bling swirl. I took a real shell and gunked on some gel medium, sprinkled it with glitter and tucked in some little treasures, one of the kit mini blue roses, a Prima pearl, a heart charm and one of the Blue Moon Trinkets from the Romance Add On.


I used some Dusty Attic Seashells from my Etsy Shop that I had painted up with the Mica's from this month's color add on. Added one to the corner of the photo, and


added one to the peek a boo I created in the bottom corner, using another piece of the crocheted piece, another mini rose and Prima Pearl. I used the Pink Paislee Mistables that came in the kit, and that I inked and added Prima Pearls as the mat for my smaller photo (hey that's me).


I used a hot air ballon from my Etsy Shop to carry the "Moments" of my journaling that reads "Life is not measured by the breaths we take, but by the moments that take our breath away." I drew out some little clouds on to chipboard, fussy cut them out then painted them using acrylic paint and some of the Blue Hawaiian Mica from the color add on. Popped on some Sea Green Glitter Glass Butterflies from my Etsy shop, and took a clear stamp and randomly stamped my card stock layer to add texture and interest.

Thanks for dropping by to share one of  those "Moments" that always takes my breath away, and that is the feeling of just how small I am in the scheme of things when standing beside something so vast-so humbling! I hope that you get to experience some of those moments this summer, but hurry, it's almost over! ~ Renea

Wednesday, August 10, 2011

Tiny Matters

Hey everybody!  It's Wednesday, and you know what that means-a new sketch has been revealed over at Twisted Sketches! The following is Sketch # 114 with the Twist being "Tiny".


The following is my interpretation of the sketch that I created squeezing my Scraps Of Darkness July Kit.  I took the sketch and flipped it 180 degrees Clock Wise and this is what I came up with.


I started with a stash piece of cardstock that I spritzed with some Lindy's Mist. The second layer is a piece of the July Kit pp that I inked and distressed the edges on and then spritzed with the same Lindy's mist and then stamped using a clear stamp and some acrylic paint. The 3rd pp layer is one of those fabulous kit pps that I punched and layered on, and the 4th layer is a piece of corrugated cardboard that I misted, painted using the Twinkling H2O's in this month's color add on, and then Rock Candied to give the chunky look. I then took some cardstock from June's add on, inked and distressed the edges and used them for photo mats.


The photos are of my son, Draven and I took them into Photoshop and gave them a really grainy look to go with the distressed look of the layout. I then took some stash chipboard wings and a heart and painted them using the H2Os and attatched them to the side. 


I then hand drew and cut out some chipboard stars and painted them with the H2Os, then set an eyelet in each of them and hung the "tiny" charms, a camera and a cell phone. Two of my DS's favorite things.  I then took the quote by Ralph Waldo Emerson, “What lies behind us and what lies before us are tiny matters compared to what lies within us” , and created the journaling and title, and fullfilling the twist of "tiny". The chipboard letters were from my Scraps of Darkness May kit, and I painted them using the H2Os, ran them through my Xyron and adhered them to the Corrugated piece.


For some interest in the corners, I took some blue eyelets, set those with my Crop A Dile and then laced and twisted copper wire through them.


Thanks for taking a peek at my interpretation of this weeks Twisted Sketch! Hope you can find the time to play along, and if you do, drop me a comment. I would love to check it out! ~Renea

Friday, August 5, 2011

Finish The Race

Bi Monthly Lisa (Raining) has a really cool challenge that she does for us over at Scraps Of Darkness 
called Skeletons In The Closet.  The following are the rules for the July-September challenge:

1. You must take a photo of an inanimate object. NO PEOPLE on your layout.

2. You must use a saying we would all be familiar with, a quote, or a movie/song title that obviously relates to the photo and also translate to something in your life.
    ( A few examples to clarify would be- photographing a tree and using a saying like "Roots or Roots to the Past" and then letting us know how that relates to your life.  Photographing a bridge and using a saying like "Building Bridges" and letting us know how that relates to your life. Photographing grass using a saying like " The grass is greener on the other side" and letting us know how that relates to your life. - Get the picture? )

3. This challenge is an exercise in getting you to scrap something that is an object and getting us to feel it. Give it life. Get us to see what you saw in it and how you fit it into your emotional life.

4. This doesn't have to be deep and dark and it can be light and fluffy. Take a photo of a road ( All roads lead to home) I hope I have given you enough ideas to make this less scary!

5. Use any products- all are welcome to join- invite your friends! Out of courtesy please refrain from mentioning any other kit clubs ( What??? other clubs exist??? No way???)

6. You have until 9/15 to get the party started!

The following is my take on that challenge using this month's Scraps of Darkness Kit. My quote is "Finish The Race" and comes from the Bible Verse "I have fought the good fight, I have finished the race, I have kept the faith." This saying and verse transcends into every aspect of my life. Whether it be doing those daily grind jobs that I get sick of, raising my son, my marriage, running, biking or whatever, I set a mental finish line and tell myself "Finish the Race." Don't get a few feet from the finish line, and give up-finish. It is the same philosophy that I raise my son with to focus ahead and get where you planned to be.


I wanted a real gutsy, industrial look to the layout. My son and I love to hang out in the Art District close to where we live. We bike down to it and spend time in the shops, restaurants, and art museums. Everything  has an industrial feel to it, because all the buildings are the old industrial buildings that once housed so many of our jobs. I wanted to capture that look and feel, so I started with some card stock from this month's add on for the base layer, added a second layer from the pp in the kit, that I deeply distressed, ripped and inked.


I then took a brick stencil and created "bricks" randomly out of Snow Tex, and painted them with glam and accented them with black paint. I then took a kit pp and made a 3rd distressed and inked layer, then a strip layer that I inked distressed and punched, then a photo mat out of the card stock add on. The photo is one I took of my running shoes in some wicked light that I had to wait for, one morning  then I grunged up the edges in PhotoShop and put the Bible Verse onto it.


I then took some of the kit trim and trimmed out the bottom of the photo. I used some Grunged Up Chipboard Gears in Rustic and a Corrugated Flower piece that I carry in my Etsy, added the metal flowers from the Flora & Fauna Add On and some Tim Holtz metal gears and formed the side layer and the gear peek a boos.


I created a rip on the side of my layout, set eyelets and laced it up with some black tennis shoe string, and popped a brad behind one of the punched crowns.

Thanks for letting me share a little piece of myself with you, and remember in whatever you are doing-Finish The Race! ~ Renea